
Note: This post contains affiliate links. As an Amazon associate, I earn commissions from qualifying purchases, at no additional cost to you.
I love to mix up quilt projects and little projects like this sweet lumbar pillow pattern. Smaller projects allow me to work on things daily and keep things fresh.
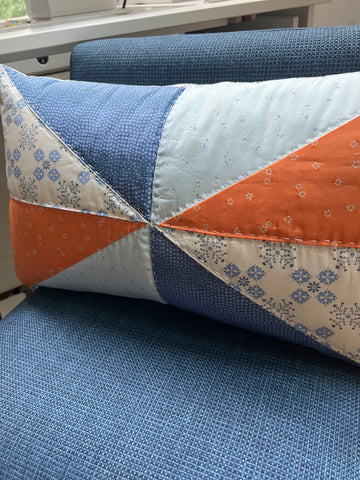
This simple pillow uses 4 half right triangle blocks to make a patchwork cover that comes together quickly. The finished pillow cover will fit a 12” x 20” insert.
I used the following fabrics from the Daisy Collection by Maureen Cracknell for Art Gallery Fabrics:

From left to right: Fallen Stones DSY-24405, Drifting Florets Marmalade DSY-24414, Drifting Florets Airy DSY24401, Floral Trellis DSY-24406
If you have never made half right triangles, the process is pretty simple. But if you have never made them before, I have a video tutorial to help you through the process.
Watch the video here.
Without further ado, here is what you need to make this pillow.
Fabric Requirements
(4) fat eighths of different fabrics for pillow front
(1) piece of 16" x 24" piece of batting (this allows an overage for quilting)
(1) piece of 16" x 24" scrap fabric for quilt sandwich backing (won’t be seen as it will be inside the pillow)
(1) half yard of fabric for the pillow backing
Optional: 8.5" x 24" quilting ruler like the one shown here for trimming
Cutting Instructions:
Cut (1) 9” x 13” rectangle from each of the fat eighths.
Cut (2) 13” x 13” squares from the pillow backing fabric.
Making the Half Right Triangle Blocks (HRT's)
(watch a video tutorial here)
1. Sort your fabrics to create 2 pairs of 9” x 13” rectangles.
Take the first set and offset them so the corners match as shown below. Be sure the fabrics are right sides together.
2. Mark a diagonal line across and sew two seams, ¼” away from the line you drew as shown below.

3. This will create two half rectangles blocks. Cut along the line you marked as shown below.

4. Press the blocks as desired.
5. Repeat steps 1-4 above with the second pair of fabrics, but be sure to match and mark the diagonal line the opposite way. See the diagram below.

(Be sure fabrics are right sides together.)
6. After all blocks are sewn, trim down to 7” x 11”. Refer to the video here if you need help.
Pillow Top Assembly
1. Arrange your blocks as desired to create a pinwheel shape. Sew the top two blocks together into a row. Repeat with the bottom blocks.

2. Sew the rows together to form the top.

3. Create a quilt sandwich by laying down your scrap quilt sandwich backing down, wrong side up, your batting, then your pillow top. Quilt as desired. (Side note: This is a perfect project for trying out some hand quilting!)
4. After your quilting is done, trim down the sandwich to prepare it for the final steps.
Assembling the Pillow Back
1. Take one of your 13” backing squares and fold in one edge by ½” and then by a ½” again to enclose the raw edge. Top stitch to create a finished edge. Make sure to backstitch at the end and beginning.
Repeat with the second 13” backing square.
2. Lay your backing pieces, right side down, onto the pillow top. There will be an overlap of about 2" to create the pillow case.
Make sure fabrics are right sides together. See the photo below for reference.

3. Pin your pieces together and sew a ½” seam along the entire perimeter.
4. Take your pillow top and trim down to a ¼” seam and clip the corners. Be sure not to cut through your seams.
5. Turn it inside out and carefully turn out the corners. Fill with a 12”x20” insert.